history of photography
Well done, accurate work.
Camera obscura

|
A camera obscura is traditionally a room with no windows except a very small hole in one of the walls. This means that, if the focal length is correct, you will get an upside-down image of what is outside, it works similar to how an eye would as it takes in a small amount of light from the lighter place and projects it.
|
...Our example
Annotation….
Explain how you made the camera
Did you find any elements difficult
Explain what focal length is.
How did you alter the focal length? How did you know that you had done this successfully
Explain how you made the camera
Did you find any elements difficult
Explain what focal length is.
How did you alter the focal length? How did you know that you had done this successfully
our camera was made with card that we cut and scored to make a square tube, then covered one side with black card that had a small hole in it and covered the other side with tracing paper so we could see the projected image. we also stuck a lens onto a small tube of card infront of the hole and adjusted the length of the tube until the image was in focus so we knew the focal length was be correct. The focal length is the correct length between the lens and the projection for it to be in focus. Afterwards we drew the image onto the tracing paper, this part was difficult as you could not see what you were drawing very well with it being upside down.

the projected image

me drawing the image
|

Rohan drawing the image

the front of our camera, with the lens on the front
|
‘What went well’ & ‘Even better if’..this might relate to
The construction
The clarity of the image projected on the back of the camera
The focal length
Your ability to draw what you could see
The construction
The clarity of the image projected on the back of the camera
The focal length
Your ability to draw what you could see
WWW: The image was in focus and we made it efficiently and effectively.
EBI: The actual camera could be presented in a neater way with the tape and different elements.
EBI: The actual camera could be presented in a neater way with the tape and different elements.
DSLR Introduction
|
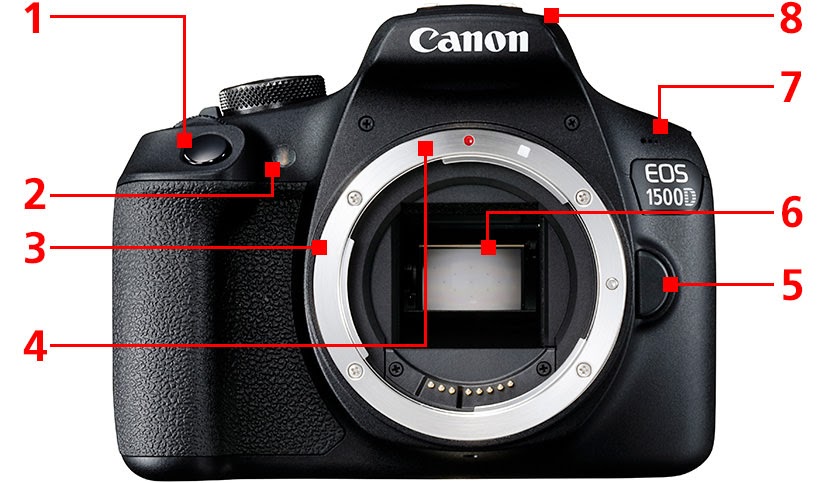
1. shutter release
2. red-eye reduction 3. lens mount 4. lens mount index 5. lens release button 6. mirror 7. microphone 8. built in flash |
|
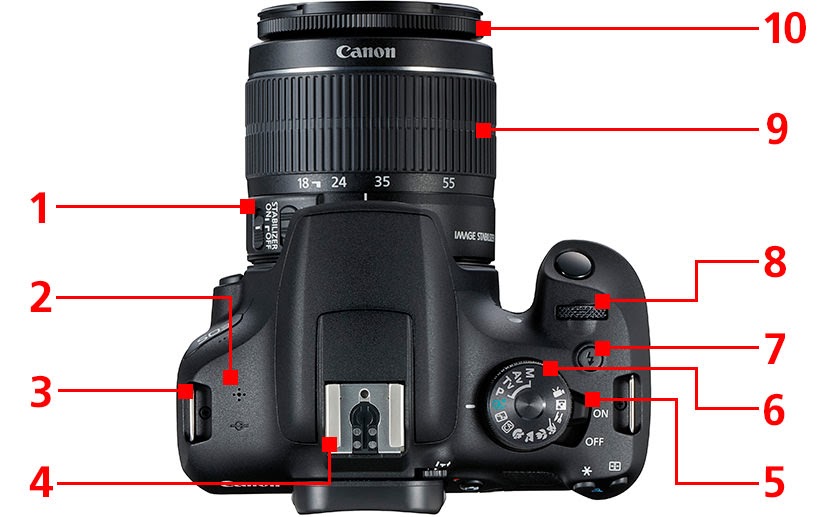
1. focus mode switch
2. speaker 3. strap mount 4. hot shoe 5. power switch 6. mode dial 7. flash button 8. main dial 9. zoom ring 10. focus ring |
|

|
1. eye cup
2. viewfinder eye piece 3. LCD monitor 4. MENU button 5. playback button 6. wifi lamp 7. access lamp 8. SET button 9. IOS speed settings button 10. quick control button 11. display button 12. errase button 13. focus point selection button 14. live view shooting/ movie shooting switch 15. dioptric adjustment knob |
|
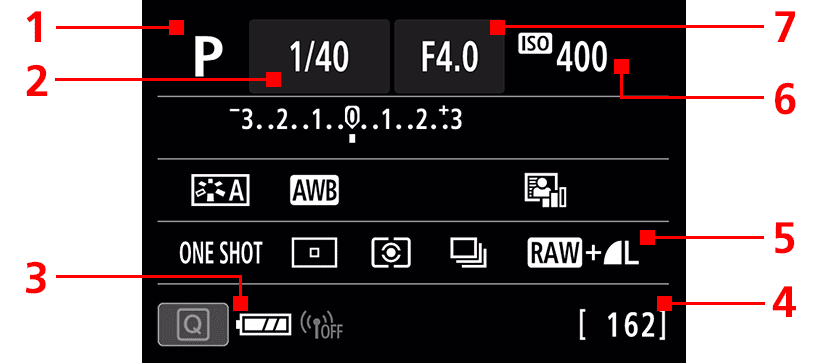
1. shooting mode
2. shutter speed 3. battery level 4. shots remaining 5. image recording format/ quality 6. ISO speed 7. aperture value |
|
My photos
we used a DSLR camera and turned the mode dial to "TV" meaning it has shutter speed priority. We put the ISO sensitivity to 400 and put the shutter speed to 1/60th. The topic was natural versus manmade, here are the photos I took:


my favourites
I used weebly to edit some of my favourite photos as shown below:

|

|
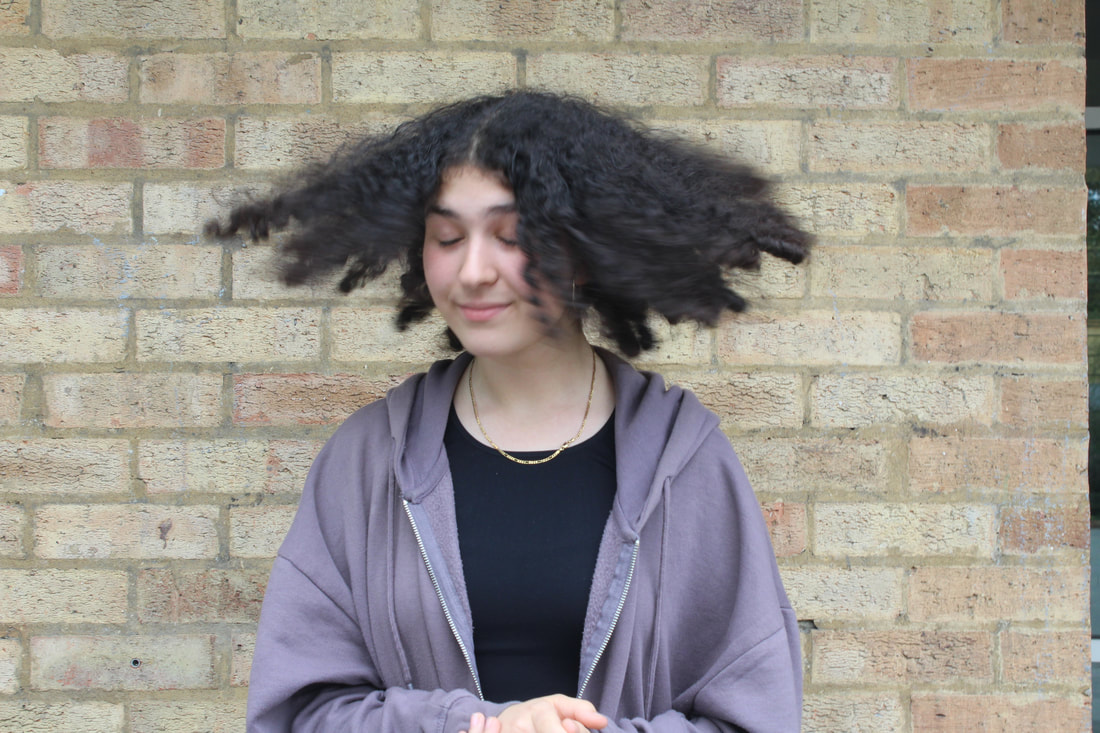
Shutter Speed
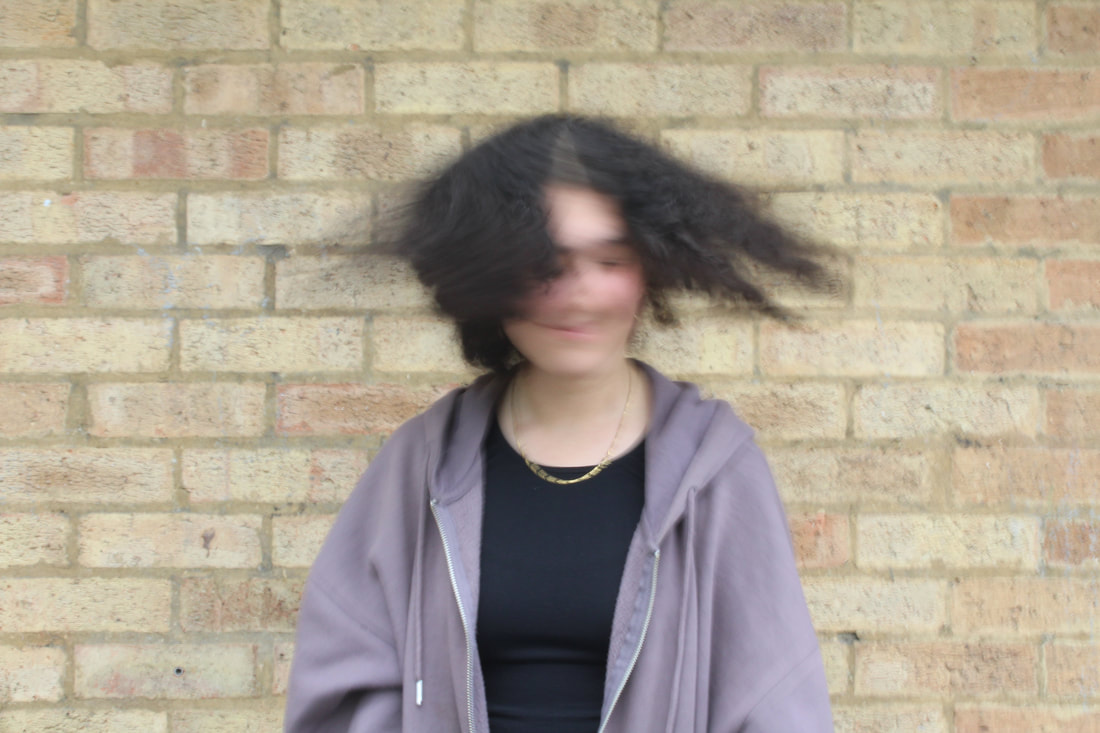
shutter speed controls the amount of time the shutter is open, therefore letting in light for different amount of times, the longer it lets the light in for, the blurrier any movement is. Shutter speed is measured in seconds (represented with a " after) or fractions of a second. Tv mode on the mode dial puts the camera into shutter speed priority. We took photos of us jumping and shaking our heads with different shutter speeds, as shown below.

Mode: Tv /
ISO: 400 /
Shutter Speed: 10
|

Mode: Tv /
ISO: 400 /
Shutter Speed: 60
|

Mode: Tv /
ISO: 400 /
Shutter Speed: 500
|
Mode: Tv /
ISO: 400 /
Shutter Speed: 10
|
Mode: Tv /
ISO: 400 /
Shutter Speed: 60
|

Mode: Tv /
ISO: 400 /
Shutter Speed: 500
|
Levitation
We took inspiration from Yowa Yowa for this task, she did a series of photos that make her appear to be levitating.

|

|

|
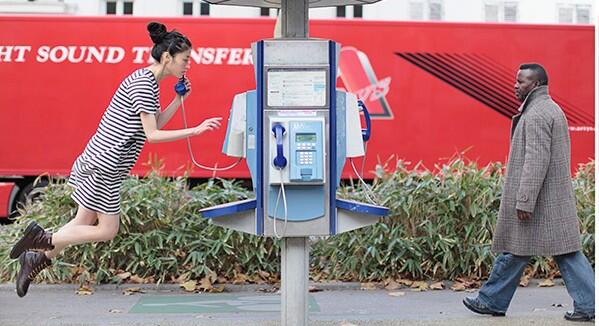
We made our own in different spaces in Fortismere by using a very fast shutter speed, a high ISO and the mode Tv.


Then I used photoshop for the first time to edit a few things about my favourite images

Mode: Tv / ISO: 6400 / Shutter Speed: 1250
|

Mode: Tv / ISO: 3200 / Shutter Speed: 1600
|
WWW: we thought of creative ways to represent the idea of levitation as well as keeping the photos with the models feet off the ground
EBI: the shutter speed could be slightly faster to capture more of an exact moment, the camera could also be slightly more in focus, especially in the second edited photo
Inside, there was less light, therefore requiring a higher ISO and a slower shutter speed, opposing the outdoors images with more light, needing a lower ISO and being able to have a faster shutter speed. The images were generally better the further off the ground the model was.
Some good examples. Just make sure that the shutter speed is fast enough to avoid any blur and that the figure doesn't jump out of the frame.
Annotate your work.
What ISO did you use
What were the lighting conditions like
What shutter speed did you have your camera on to achieve the best outcome?
What went well, even better if...
What tips would you give to someone about to attempt the levitation images. (Think about camera settings and what the model needs to do / not do)
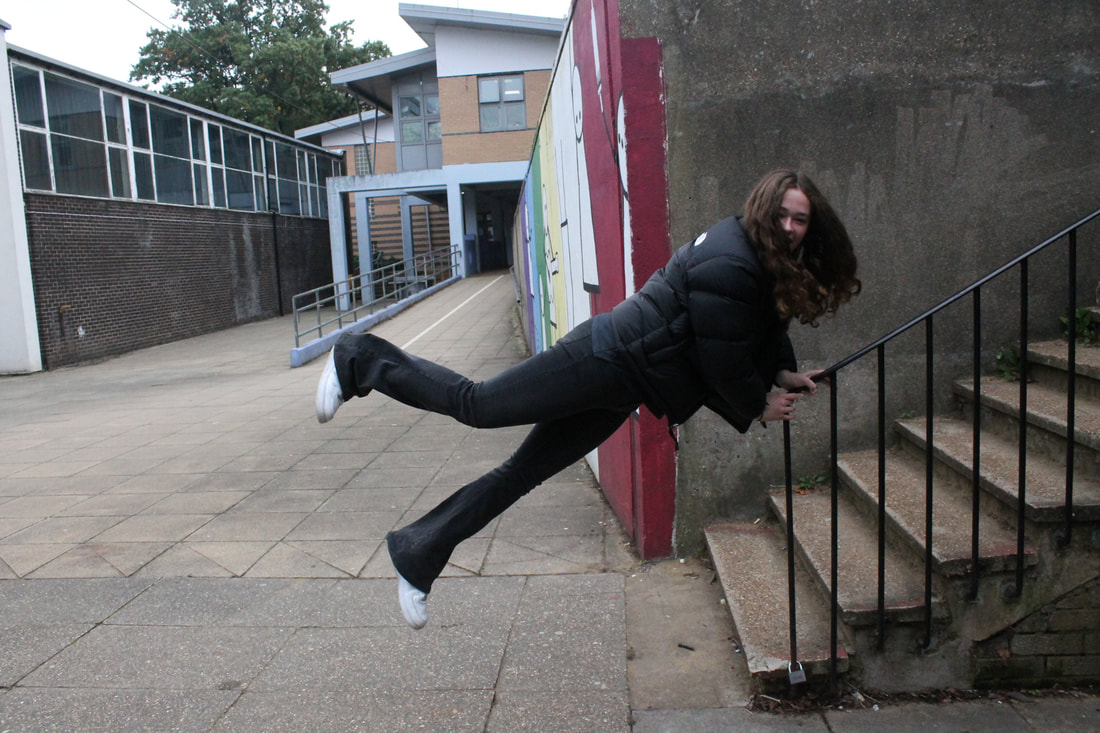
Homework: levitation images

Mode: Tv / ISO: 6400 / Shutter Speed: 1000
|

|
I used photoshop to change the size and adjust the light levels of my favourite photo I took as homework.
WWW: the levitation looks realistic, the photo is eye-catching and colourful
EBI: there could be less open space on the right and the focus could be slightly adjusted
The photos I took for homework and the photos I took indoors had less light, meaning the ISO had to be higher and the shutter speed needed to be a little slower. Although we got told at the beginning to keep our feet flat, I found that it also worked quite well to have pointed feet, making it look as if the model is taking off from the ground.
Francesca woodman
Francesca Woodman intended to evoke uncanny feelings in her photos. She often used unusual objects as well as mirrors, pegs and glass panels to make herself appear grotesque and distorted. Transforming and blurring her body in photographs portrayed disturbing psychological states and showed how she wished to not appeal to the male gaze. Her photos were inspired by photographers like Guy Bourdin, Deborah Turbville and Max Klinga who took surreal photos, mostly in black and white. When looking at Francesca's photography, you can see elements of these photographers the images.

|

|

|
We made our own inspired by Woodman


I edited 3 of my favourites, taking some screenshots of the process.

|

|

|

|

|
WWW: I took interesting images that portrayed Woodman's goal of evoking uncanny feelings and not appealing to the male gaze
EBI: In most of the photos the background is blurred unintentionally, next time I should take care to keep the camera still as to not blur the background
EBI: In most of the photos the background is blurred unintentionally, next time I should take care to keep the camera still as to not blur the background
aperture
Aperture is the opening to the lens, the smaller the aperture, the longer the photo should be taken for because less light is let in through the small opening and vice verca. You can use aperture to change the depth of field, allowing you to take some creative photos by adjusting it. The depth of field is how much distance is in focus, a shallow depth of field focuses only on the nearest thing, on the other hand, a wide depth of field focuses on a larger area.

The photos below were taken by me and my groups, we experimented with a shallow depth of field.
set one


set two

mode: Av / aperture: 5 / ISO: 800
|

mode: Av / aperture: 11 / ISO: 800
|

mode: Av / aperture: 32 / ISO: 800
|
a higher number for the aperture means a smaller aperture resulting in a shallower depth of field, therefore the photo on the right has a more shallow depth of field and the photo on the left has a wider depth of field, you can see this in the photos above.
WWW: Our photos were in focus and well composed
EBI: The difference in aperture was larger so it was still obvious as a compressed image
Our group also took creative photos using a shallow depth of field.
WWW: Our photos were in focus and well composed
EBI: The difference in aperture was larger so it was still obvious as a compressed image
Our group also took creative photos using a shallow depth of field.


Gifs!
Eadweard Muybridge was a physiologist and a photographer, he photographed animals in movement and made a series of pictures that made up the movement. His first example of this was when he proved that when a horse is running, all four of its hooves left the floor at once, he did this by setting up a tripwire the horse activated and taking a storyboard of pictures demonstrating it's movement. Muybridge wanted to uncover the truth of motion. His way of presenting his photographs was much like a gif, and the pictures can easily be put into that form today, allowing many more people to explore the wonders of his work.
We made our own gif, using photoshop to put it together.
We made our own gif, using photoshop to put it together.
Gif 1
The first gif our group made is shown below. We took photos keeping the camera still but every photo we moved closer, then we continued it by moving backwards with the camera. On photoshop, I opened the files into a stack, then converted the layers into frames using the animation tab.


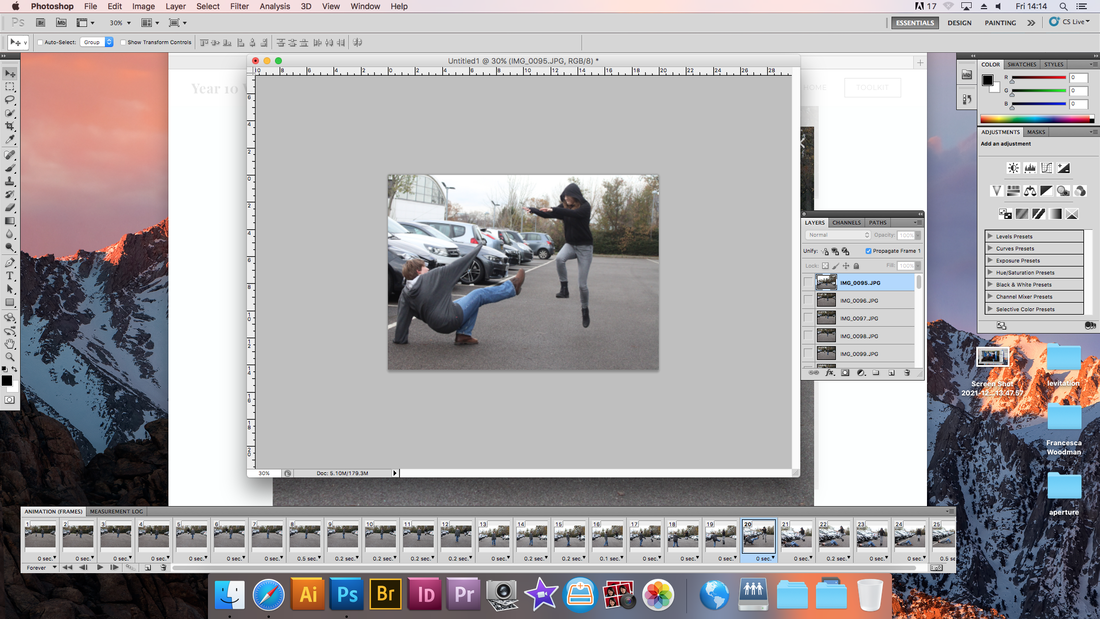
Creative gifs

For the gif above we used a fast shutter speed to not blur the shots where we have jumped, because of this we had a wide depth of field to keep a good exposure. We kept the ISO quite high as we were shooting inside and it was relatively dark. In photoshop, after putting it together as I did for the first gif, I adjusted the brightness and contrast as well as timing the frames as I wished. attached below is a screenshot of the process.

|
|
For the gif below we also used a fast shutter speed to give the illusion of levitation, which again meant that we had a wide depth of field. The ISO, however, was much lower because we were outside on a relatively bright day. In the shooting of this gif we had to keep the camera in the same place while continually moving towards it, to give the impression of levitation, the model had to jump in every shot. I edited the timings in photoshop to make it more dramatic and comprehendible and it turned out as it is now.

Romain Laurent
|
Romain Laurent creates cinemagraphs such as the one to the right. They say that they want to 'work on personal ideas' and not dwell on their ideas too much even if they aren't perfect. These ideas come from a creative childhood energy when Romain used to think of something and just do it.
unfinished |
|
